Note: clicking on the images below will display enlarged pictures for better viewing.
The first item I would like to take a look at is creating garbage mattes in Final Cut Pro.
 fig.1
fig.1Recently I had a job where a well intentioned DP shot talking head interviews in front of a white tarp to make for a clean white background. However due to lighting issues (and sometimes framing issues!) the shots had problems around the edges. Apart from the problems with overexposure and contrast (please watch your levels while shooting!) I needed to find a way to get rid of the ratty edges. This was a perfect opportunity to use some garbage mattes!
1/ I created a Color Solid Matte in the Viewer (click on the Generator drop-down menu at the bottom right of the Viewer window and select Matte>Color Solid). I changed the color to white using the eye-dropper tool to match the white background in the shot by simply clicking the eye-dropper over the shot in the Canvas (the color option is available in the Controls tab of the Viewer).
2/ I then dropped the Eight-Point Garbage Matte into my Filter tab in the Viewer (it is available in the 'Matte' category, accessible from either the Effects tab in the Browser or the Effects drop-down menu). At this point I could see the parameters in the Filter tab and a white screen with numbers at the corners in the Video tab.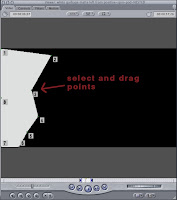 fig.2
fig.2
I could now drag the points of the Garbage Matte, however to better see where I was going I needed to place the matte over the shot. To do this I needed to create a new video track in the Timeline (control-click in the Track area of the Timeline and add new track or use the Sequence>Insert Tracks drop-down menu). This new track would host my (now white) garbage matte. (fig. 3 section A) fig.2
fig.23/ *Important!* At this point I saved my white garbage-matte clip from the Viewer into the Browser (simply clicking and dragging it over from the Video tab) and called it 'white garbage-matte left' (see section D in fig.3 ). This step is often overlooked and with one stray mouse click the matte disappears from the Viewer never to be seen again! Always save your mattes, titles and effects while working by simply dragging them to your Browser. (note: you will need to re-load them into your Viewer to make changes! )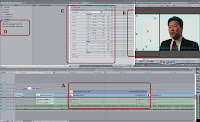 fig.3
fig.3
4/ Now I could Overwrite my new 'white garbage-matte left' clip onto video track 2. To do this and match the length of my original shot, I placed the Timeline Playhead over my shot on video track 1 and hit X. This selects the length of the clip under the Playhead as your In to Out duration. I made sure to select video track 2 as my destination track in the patchbay (left hand side of the Timeline track area) and un-patched the audio tracks (which at this point in my edit were already locked anyway). I hit Overwrite (F10). (see section A in fig.3) Now I could see my garbage matte overlayed on my shot in the Canvas (see fig.3 section B) note: if you can't see your matte points in the Canvas, make sure your Timeline Playhead is in the right position and turn on the Excess Luma overlays (overlay drop-down menu in the Canvas)
5/ I turned on Image + Wireframe in my Canvas overlay drop-down menu so that I could access the points in the Canvas. In my Viewer I switched to the Filters tab and one by one I selected the anchor points of my matte (fig. 3 section C). This activated each point in turn which I could manually drag around in my Canvas window to mask the ratty edges on my shot. (fig.3 section B). *Important!* Be sure to have 'preview' selected in your Eight-Point Garbage Matte view mode. (fig. 3 section C) At this point if needed I could adjust the color of the matte to better match the underlying shot by simply accessing the Controls tab the in the Viewer once again.
There you are: a nice and easy way to mask a less than perfect shot without having to resize it.
 fig.3
fig.34/ Now I could Overwrite my new 'white garbage-matte left' clip onto video track 2. To do this and match the length of my original shot, I placed the Timeline Playhead over my shot on video track 1 and hit X. This selects the length of the clip under the Playhead as your In to Out duration. I made sure to select video track 2 as my destination track in the patchbay (left hand side of the Timeline track area) and un-patched the audio tracks (which at this point in my edit were already locked anyway). I hit Overwrite (F10). (see section A in fig.3) Now I could see my garbage matte overlayed on my shot in the Canvas (see fig.3 section B) note: if you can't see your matte points in the Canvas, make sure your Timeline Playhead is in the right position and turn on the Excess Luma overlays (overlay drop-down menu in the Canvas)
5/ I turned on Image + Wireframe in my Canvas overlay drop-down menu so that I could access the points in the Canvas. In my Viewer I switched to the Filters tab and one by one I selected the anchor points of my matte (fig. 3 section C). This activated each point in turn which I could manually drag around in my Canvas window to mask the ratty edges on my shot. (fig.3 section B). *Important!* Be sure to have 'preview' selected in your Eight-Point Garbage Matte view mode. (fig. 3 section C) At this point if needed I could adjust the color of the matte to better match the underlying shot by simply accessing the Controls tab the in the Viewer once again.
There you are: a nice and easy way to mask a less than perfect shot without having to resize it.
3 comments:
Excellent ...very useful guide
Phil
How can I ever thank you enough? This article is so clearly written and is exactly what I need and have been searching for. It was truly "heaven sent." THANK YOU!
Question: Is there a way to excede 8 mattes? I know you can combine the 8 mattes, but how about more?
Post a Comment