Showing posts with label Final Cut Pro. Show all posts

Dec 31, 2021

Perhaps a New Year resolution to revive this blog? 😅

 Ok guys, this blog has been dormant for almost 5 years. I truly apologize. Priorities in my life and career changed and I had to focus in other areas. I realize that this blog did have some helpful features for readers, in particular editors, animators and post-production professionals. I particularly enjoy helping students figure out how to manage edit jobs or discover new tricks and tips. So I am considering reviving this blog. Hopefully I will not be to overwhelmed by work to keep it current. So much has changed since Final Cut Pro 7 was the go to NLE! 😃 I will share what I learn using Premiere and other software. Look forward to getting back in touch. Thanks!

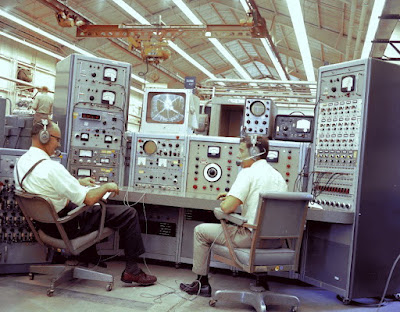
Funny picture of what it used to look like at an old school master control


Nov 1, 2011

Saints (Video) Training.

This summer I taught a Final Cut Pro class at the Saints Football training facility in New Orleans.

Even though it was off season it was still fun to be in the 2010 World Champion New Orleans Saints training facility and to be able to visit the locker-room.

The class was for the Saints Football internal video department and the online and social marketing department.  Their needs range from providing video feeds and highlight reels to broadcasters, to training reels, marketing materials and online videos.

We had a very intense and focused class touching on in-depth principles of editing, media management, compression, graphics and animation.  

I just wanted to say thanks to the guys at the Saints Football training facility in New Orleans for such a warm welcome.  In particular I would like to thank Jason Trosclair for booking the class and making sure everything worked great.  I would also like to thank Erica Dudas and the folks at NOVAC for scheduling and facilitating this class.

..and of course Go Saints!!

Mar 23, 2011

Bronze Telly Award


I am very happy and proud to announce I have just won my second Telly Award for editing on Reebok, Old Orchard Beach.  This was a big project which involved logging 35 hours of footage shot in 4 American cities.  I had 3 assistant editors help with ingest, logging and selecting the footage.  Wrangling all the footage and all the moving parts was a big challenge which took advanced media management skills.  Another technical tour de force involved seamlessly matching into footage sourced in different formats.  I cut a 28 min. mockumentary for Reebok that included interviews of over 20 people.  After cutting the long form piece, the client requested a 'hotmix' or 3 min. trailer, which you can view here on Vimeo.


The video was produced by David Wales at Ministry Of Culture and was written and directed by David Wales and Mara Marich of Aquarium Creative Agency.

Jul 28, 2010

Final Cut Pro 7 Advanced Editing at UT in Austin

Just taught a great FCP7 level 2 class at University of Texas last week with the Digital Media Academy. The students were very motivated and skilled and we were able to explore in depth editing concepts such as color correction, proper acquisition and ingest, and media management.

Thanks to Rolando, Gino and Valerie for a great class and special thanks to Scott Hall in Austin.

Jul 5, 2010

Sound Track Pro cert

Summer Classes

Just finished teaching a Final Cut Pro 200 class at Harvard University and a Sound Track Pro class at NOVAC in New Orleans. Here is a comment from one of my students:

Hey Beau,

I really learned a lot in your sound class. Thanks so much for your time and for answering all my crazy questions. I love the idea of nesting sequences within FCP and having a master sequence for the whole movie that updates when I make changes to the sequences within that master file. This can definitely work where each scene is a new sequence. I just had one question about that.

We have several scenes where the music or dialogue from one scene bleeds into the next. This has been a great way to connect the scenes, and to keep people engaged from one scene to the next. Can you do this with the sequences? Can audio bleed from one sequence to the next like that?

Thanks again for all your help.

Cheers,

Helen Krieger
http://www.imdb.com/title/tt1627892/
http://www.facebook.com/floodstreets.movie
www.floodstreetsmovie.com

Helen,

thanks for the nice comments! 

Yes, you can have a music bed transition from one sequence to another.  Just set your music on separate tracks underneath your sequences.  You can then nest all the clips in a sequence excluding the music bed (select all clips except the music clips, Sequence >Nest Items).  That way you can have several sequences on top of a single music bed. 

At some point I would still look for a break point in your movie.  It can be when there is a fade to black, or the beginning of some other scene.  There is usually always a break point you can use as your sequence end.

Finally, I would nest everything into one large 'Output' sequence, which will give you more control over the whole movie at once, say of for example if you want to put a letterbox on it or something.

Feb 3, 2010

Final Cut Pro 7 classes

I just got back from teaching Final Cut Pro 7 at Future Media Concepts in Philadelphia.  It was a great class with very motivated professionals.  The students ranged from senior TV producers at QVC and NBC to documentary filmmakers.  Everyone was very engaged in learning the new tools that FCP7 brings to bear in the post-production process.

I will write articles in the coming weeks about these new features as well as more tips and tricks to use while editing.  In the meantime I wanted to thank everyone at Future Media Concepts, particularly Jennifer Herman and Tom Wilson.

"Hi Beau.  Just a note to say thank you for a great learning experience the past three days.  I was very pleased with the course structure and your facilitation of it, and thought that you did a good job managing the pace of the course to everyone's skill levels.  I am looking forward to applying all of the basic knowledge of the course over the coming weeks: IT is installing my FCP-loaded Mac at my desk today.  Thank you again for your time and great facilitation skills!"

Best regards,

Wade B. Walton
Managing Producer, Content
QVC Inc.

Dec 3, 2009

Apple FCP 7 training

I am currently at Apple in Cupertino, CA getting my Final Cut Pro 7 trainer re-certification.


I will write a post on the new features in Final Cut Pro 7 soon!

Nov 10, 2009

Editing in HD in Final Cut Pro

Here's a quickie:

If you are looking to save disk space and speed up your edit while working on an HD job, you can always capture your footage and edit in DV mode (or any number of the new Pro Res formats) and once you are happy with the edit, convert your whole project back to HD using Media Manager.

Simply save your final Sequence in Media Manager with 'Create Offline' set to your HD settings. Obviously before you can do that you will need to recapture all your footage in HD!


note the format is set to HDTV 720p here

This brings up a good point. If you shot on tape: label your tapes correctly and don't forget to change the reel number each time you Log & Capture your footage! This is essential to a smooth job. If you shot on P2, well you will need to back that baby up-- probably twice for safety! (So who says P2s save time and space? One little mini-dv tape vs. a P2 card + a laptop + a hard drive + another hard drive + power supply. Oh well! )

The number one problem faced by most newbies is: "where is my footage?"


More strategies to deal with that in another post.

Apr 16, 2009

Audio Trims in Final Cut Pro

At some point in your edit you are going to want to move that edit point a little to the left or to the right to get it just right. In particular when cutting to audio you will have a circumstance where there might be a little noise blip or other missing word in your dialog that you need to fix. The best way to do that is with a Ripple Edit. (please- no more razor blades! )

The Ripple tool is located in the tool bar and can be activated by the keyboard shortcut RR. (The Ripple tool looks kind of like a figure 6 - it actually represents a rolled up film strip). To Ripple an edit you must select it first. That means clicking on the seam of the edit. A shorter and better way to select an edit is to position the playhead on the edit with the up and down arrow keys and then hitting V.

To effectively Ripple your edit you need to make a decision about which of the two abutting clips you will be extending to the right or to the left. Do you want to extend the In point of the incoming clip or the Out point of the outgoing clip? By hitting the U key after having selected your edit you can choose which clip you are extending. Notice the highlight jumps to the left or the right of the edit. Make sure your Timeline playhead is on the selected edit, this is important for watching the edit in the Canvas.

The right side of this edit is selected.

Once you have decided which clip you want to extend (to the left or to the right) you need to load that clip in the Viewer for a closer look. Double clicking on the clip will load it in the Viewer. Double clicking the clip in the Timeline can be done even though the Ripple tool is still active. Once in the Viewer you can select the Audio Tab to see the Audio Waveform. A good thing to do at this point is to hit SHIFT - Z to fit the whole audio waveform into the viewer window so you can see the In and Out points clearly.

In this picture I am trimming the In point of the Incoming clip. Note the waveform in the Viewer. (click for larger image)

Very Important: at this point you must activate the Timeline window, by clicking on it's title bar (get in the habit of clicking on the title bar of the window you want to activate). Then by using the < and > keys you can trim your edit in one frame increments to the left or to the right. Keep an eye on your audio waveform in the Viewer for the actual spot you want to trim to and the In or Out point will move along as you hit < and >. (Note: the Playhead will not move along with you so you need to keep an eye on the Mark point and the waveform, not the Playhead.) You can also use SHIFT > and < to edit in multi-frame increments, that you can set in the User Preferences.

Here I have trimmed the In point of the Incoming clip to the left a few frames. Note the new position of the Mark In. The Viewer Playhead has not moved, while the Timeline playhead remains on the edit. (click for larger image)

Using this method you can trim an audio edit visually by simultaneously looking at the Viewer and the Canvas while you trim in the Timeline. Additionally if you zoom in to the Viewer (Command +) you can hone in on a very tiny area of the audio clip and make micro-edits. The whole advantage of doing your Ripple in the Timeline while watching the audio waveform in the Viewer is that you can simultaneously watch the updated video frame in the Canvas. The Canvas will update to the current new In (or Out) point as you trim. This way your Timeline playhead stays on the frame you are editing, while your Viewer playhead is untouched.

Command + will zoom in to the waveform in the Viewer. The black bar represents one frame of video. (click for larger image)

(Remeber, to play back an edit it is always better to hit the \ key. This plays back the edit without the trouble of mousing around in the Timeline.)

Have Fun! :)

ps: feel free to ask any questions if you are still puzzled about something!

Dec 20, 2008

Working with older versions of Final Cut Pro.

Sounds impossible, doesn't it?

Well, this is my little Christmas present for all of you editors working on the go and taking projects with you from one machine to the next. What a dreadful feeling to discover that the Mac you are trying to work on only has FCP5 installed and your project is formatted for FCP6! You got that heart sinking "File's format is too new for this version of the application" message. AAARGGH!! And you thought you were being clever by taking your external FW800 drive with you!

As promised, here is my gift to you: there is a way! ;)

First, you will need to do some preparation in advance before jumping on that plane with your wife's laptop, hoping to edit at the hotel. While still in FCP6 you need to do this:

1/ EXPORT THE BATCH LIST:

Open the project you want to export, make sure the BROWSER is active and select all (cmd A). Under the FILE menu, go to EXPORT > BATCH LIST. This will export a tabulated text file of ALL of your clips item properties, including timecodes and reel numbers. (*This is why it is very important to be very thorough when Logging & Capturing -ALWAYS PUT THE CORRECT REEL NUMBER!*) This file will appear like this:2/ EXPORT YOUR EDLs (Edit Decision Lists):

The Batch List file contains information about your entire project, however FCP5 will not recognize the Sequences information, which is a problem since these contain all your edits. You will need to export your Edit Decision Lists. To do that, SELECT THE SEQUENCE IN THE BROWSER and go to FILE>EXPORT>EDL. You will get this dialog window:
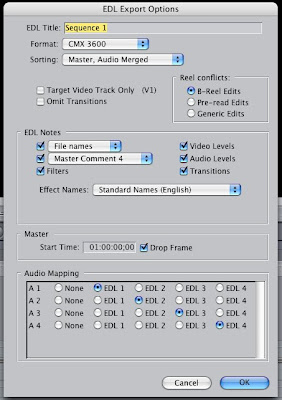
You can ignore most of these choices, leaving the default settings selected, although I believe the Sorting, Audio Merged button does effect how your audio is exported (more on that in another post...) Click OK. You will need to do this for every Sequence you wish to export.

3/ TAKE THE BATCH LIST & EDLs WITH YOU:

I can't help you if you forget to take these along with your iPod, Blackberry, cellphone, laptop, extra battery, portable hard drive, James Lee Burke novel, favorite pen and really jazzy tie (or shoes, for you girls)! :)

4/ OPEN THE BATCH LIST AND EDLs IN FCP5:

This is the final step and should provide you with instant joy! To open the BATCH LIST go to FILE>IMPORT>BATCH LIST AT 29.97 (*note: I haven't done this with HD or 24p material, so you will have to experiment or use your MEDIA MANAGER in a judicious way. If you have a good work around please post it here!*)

Import the EDLs by going to FILE>IMPORT>EDL. You will get this window:
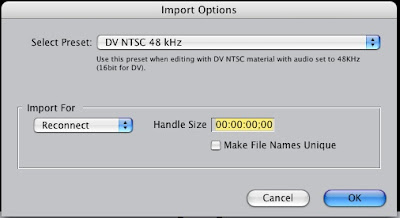
It is important to make sure the Import For drop down menu says Reconnect. While the Batch List will give you the full list of clips (without Bins...you will have to compromise a bit here) they will be offline and you will need to reconnect these from your hard drive. Your EDLs will come in as Sequences, that you will also need to reconnect to their media files.

PRESTO! FCP6 to FCP5 MAGIC!! *applause* Thank you, thank you...

With that I bid you Merry Christmas and a very Happy New Year 2009!
Aug 28, 2008

Final Cut Pro Certification Level 2

"(...)The second course I had the privilege to enjoy was Final Cut Pro Level 2, helmed by a well-seasoned veteran of video editing dating back decades. Beau Tardy’s impressive list of clients and former employers read like a who’s who of high-profile power players in the entertainment industry. With this kind of experience, one might expect a gruff and short temperament but Beau was welcoming and demonstrated a bright disposition. Beau also saw fit to share his website with students and I intend to utilize this valuable resource to the fullest. Being in Beau’s class as he provided his insights and lessons was worth much more than the tuition price. If DMAs goal is to continue to turn out graduates who are prepared for the industry, it is imperative that you retain Beau’s services, as his experience and attention to detail are exceptional models for aspiring editors. Beau’s remarkable combination of proficiency and approachability are one of DMA’s most viable assets and will maintain the organization’s cutting edge in regard to professional training."

Thanks to Mike Foster of Austin, TX.

As a recently minted Level 2 Final Cut Pro Trainer, I have been very busy this summer traveling around to different training centers and meeting great people along the way. In June I had the chance to teach at Future Media Concepts in Boston (thanks Keri!). Then in July I taught for Digital Media Academy in Austin at the University of Texas (photos). We had a fun class and a good all around experience. I would like to thank Scott Hall at DMA Austin for making it all work out. The facilities were excellent and the students were highly motivated.


Additionally I taught two classes at U Penn in Philadelphia, Final Cut Pro Level 1 & 2. Again the students were motivated and eager to know more about editing with FCP. I would like to thank Dave Livingston of DMA for organizing the classes and providing us with backup support.

Finally, I recently taught Paula Costlow, the TV Production teacher at Basking Ridge High School in New Jersey (a beautiful school by the way!) She was keen on learning the ins and outs of media management in Final Cut Pro, which is a subject I like to focus on because I believe it is probably the area most overlooked.

In September I will most likely be teaching at Future Media Concepts in Philadelphia and possible Washington, DC. If you are interested in Apple Certified classes by all means get in touch with the FMC in your area and be sure to mention my name!

Apr 15, 2008

Flash 8 to Quicktime workaround

Through trial and error I have devised a workaround that might provide some relief to those of you seeking to export a usable quicktime movie originating from Flash 8.

I have often used Flash to create graphics movies to be used as elements inside a video edit. I would typically publish a quicktime from my .fla file and import that quicktime into Final Cut Pro, including movies with a transparent background (alpha channel).

These days that is not so easy. Somehow Flash 8 will not export a usable quicktime from a .fla file that contains embedded symbols such as movies or transparent layers. (Adobe claims that the Flash CS3 upgrade will export to Quicktime with effects).

Upon export Flash 8 will prompt you to set to export at Flash 5 settings, which is not always usable if you have layers with filters on them that are only supported in Flash 8. Embedded movies (symbols) will not export properly either. The workaround is simple actually: use Snapz Pro X.

Procedure:
  1. Publish your .fla as a .swf movie with format settings at Flash 8. Be sure your JPEG quality is at 100%. If you are exporting with the view of going to video make sure your document background and frame rate have the correct settings (720 x 480 for full resolution NTSC / 30 fps). Publish your movie then open it with Flash Player on your desktop, making sure you are displaying it at 100% size with quality on High (View menu).
  2. Open Snapz Pro X, click on the 'Movie' option. Adjust your selection window to include the full window of the Flash movie and give yourself a little bit of a border around it as well. The Flash movie should be playing back in looping mode. Set the Snapz capture window at Framerate :30/ Color Change: millions/ Scale: 100% and check the Smoother Video Capture radio button (turn off the Cursor Visible button). Press return to capture the movie, letting it loop a couple of times.
  3. Stop the record. In the Movie saving setting window click on the Settings button. Change the export settings to Compression type: None / Frames per second: 30 / Quality: Best. It is important when going to video to use None as your compression setting (in Quicktime as well) this will afford you the best resolution throughout your post-production workflow. (None is a better setting to use than 10 bit uncompressed ! Oh, and never, never, never use the Animation codec!!)
  4. Save your movie.
You can now import your movie into Final Cut Pro as a workable quicktime.

P.S. If you need a transparent background, I would suggest making your Flash movie on a clean blue background and using the Keyer in Final Cut Pro.

Feb 28, 2008

Garbage Mattes in Final Cut Pro

Preface: I have gotten tons of hits on this article! That's a good thing- obviously a lot of you want to find out how to use garbage mattes (it's easy!). So if you think this article is useful, why not say so in the comments? I'd appreciate the feedback and your experience might help enlighten others too! So whaddya say? Leave a comment! Thanks!

Note: clicking on the images below will display enlarged pictures for better viewing.

The first item I would like to take a look at is creating garbage mattes in Final Cut Pro.
(click on image to enlarge)

Recently I had a job where a well intentioned DP shot talking head interviews in front of a white tarp to make for a clean white background. However due to lighting issues (and sometimes framing issues!) the shots had problems around the edges. Apart from the problems with overexposure and contrast (please watch your levels while shooting!) I needed to find a way to get rid of the ratty edges. This was a perfect opportunity to use some garbage mattes!

1/ I created a Color Solid Matte in the Viewer (click on the Generator drop-down menu at the bottom right of the Viewer window and select Matte>Color Solid). I changed the color to white using the eye-dropper tool to match the white background in the shot by simply clicking the eye-dropper over the shot in the Canvas (the color option is available in the Controls tab of the Viewer).

2/ I then dropped the Eight-Point Garbage Matte into my Filter tab in the Viewer (it is available in the 'Matte' category, accessible from either the Effects tab in the Browser or the Effects drop-down menu). At this point I could see the parameters in the Filter tab and a white screen with numbers at the corners in the Video tab.fig.2
I could now drag the points of the Garbage Matte, however to better see where I was going I needed to place the matte over the shot. To do this I needed to create a new video track in the Timeline (control-click in the Track area of the Timeline and add new track or use the Sequence>Insert Tracks drop-down menu). This new track would host my (now white) garbage matte. (fig. 3 section A)

3/ *Important!* At this point I saved my white garbage-matte clip from the Viewer into the Browser (simply clicking and dragging it over from the Video tab) and called it 'white garbage-matte left' (see section D in fig.3 ). This step is often overlooked and with one stray mouse click the matte disappears from the Viewer never to be seen again! Always save your mattes, titles and effects while working by simply dragging them to your Browser. (note: you will need to re-load them into your Viewer to make changes! )fig.3
4/ Now I could Overwrite my new 'white garbage-matte left' clip onto video track 2. To do this and match the length of my original shot, I placed the Timeline Playhead over my shot on video track 1 and hit X. This selects the length of the clip under the Playhead as your In to Out duration. I made sure to select video track 2 as my destination track in the patchbay (left hand side of the Timeline track area) and un-patched the audio tracks (which at this point in my edit were already locked anyway). I hit Overwrite (F10). (see section A in fig.3) Now I could see my garbage matte overlayed on my shot in the Canvas (see fig.3 section B) note: if you can't see your matte points in the Canvas, make sure your Timeline Playhead is in the right position and turn on the Excess Luma overlays (overlay drop-down menu in the Canvas)

5/ I turned on Image + Wireframe in my Canvas overlay drop-down menu so that I could access the points in the Canvas. In my Viewer I switched to the Filters tab and one by one I selected the anchor points of my matte (fig. 3 section C). This activated each point in turn which I could manually drag around in my Canvas window to mask the ratty edges on my shot. (fig.3 section B). *Important!* Be sure to have 'preview' selected in your Eight-Point Garbage Matte view mode. (fig. 3 section C) At this point if needed I could adjust the color of the matte to better match the underlying shot by simply accessing the Controls tab the in the Viewer once again.

There you are: a nice and easy way to mask a less than perfect shot without having to resize it.

Dec 27, 2007

Future Media Concepts


Happy holidays!

I wanted to take this opportunity to thank the people at Future Media Concepts in Philadelphia for whom I have been teaching Final Cut Pro 6. Cathleen Peters runs the Philadelphia office. I have been teaching FCP 101 to great students ranging from producers at QVC Network to Penn State professors and alumni. Its great to meet all these new folks and help them with their editing careers. I look forward to more in 2008! (my next class
is Jan. 10-12, 2008).

Oct 27, 2007

Ministry Of Culture, Ableton, Princeton TV30

Hey Beau,

Thanks so much for putting in a stellar effort here! We will certainly keep you in mind for any and all future video production tasks at Ableton, Inc. and Ableton AG.

Best,
David Cross
Public Media Coordinator

----
It certainly feels good to have a satisfied client. Working with the folks at Ableton was a pleasure. It was a bonus to work for a bunch of great creative people. Thanks Ableton!

Currently I am editing a piece for Ministry Of Culture, more on that later.

I just finished giving an introduction to FCP class at Community TV 30 in Princeton, NJ. By all accounts it went well and it was fun to see people learn how to edit more efficiently. I sometimes direct live TV shows at TV30. You can view them here.

I am now officially re-certified to train Final Cut Pro 6, and therefor I can use this logo:

Sep 20, 2007

Ableton, Final Cut Pro 6, New Edit Suite

Back from Labor Day and it feels like the end of summer already. Too bad. Thankfully I have been busy with some good projects.

First of all I am in the process of getting Apple Certified for Final Cut Pro 6, the new NLE from Apple that is part of Final Cut Studio 2 ( I am already FCP 5 certified, see below). FCP6 is a very powerful editing program and used in combination with Motion 3, Soundtrack Pro 2 and Color becomes and all encompassing post-production suite.

Speaking of sweet suites, we have just purchased a Mac Pro G5 Titanium 2 x 3Ghz processors Quad Core Intel Xeon with 5Gb of ram. In addition we installed a Sunix Firewire 400 and Firewire 800 PCI express card to handle the extra drives and speed things up. We go I/O with a Blackmagic DeckLink HD Extreme swithchable HD/SD video card that supports 1080 lines at 23.98 progressive, 25 progressive, 30 progressive, 50 interlace, 59.94 interlace, 60 interlace, 720 lines at 50 progressive, 59.94 progressive and 60 progressive, additionally all native SD formats. So basically we're smokin'. We can handle your editing and remastering jobs, no problem.

While Soundtrack Pro is a highly capable sound editing and mixing tool, I prefer to use Ableton Live 6 for audio building. With its intuitive performance oriented interface, I can compose and mix in a free way. This is very important since a lot of our work is music driven. Ableton added video playback support to Live 6 which makes it easier to time the tracks. In fact I am in the process of finishing off a job for the good folks at Ableton, Inc in New York. We are remastering the video for their Promotional and Tutorial DVD, which features great insider tips on how to get the best out of Live 6.

Also just polished off a job for the good folks at 3 Rings Media in New York.

Well, that's it for now, back to my Final Cut Pro 6 training manual.


P.S. We are also in the process of rebuilding our audio suite, I will update in a future blog. Thanks.

Mar 5, 2007

Final Cut Pro Certified

It's official I am now an Apple Certified Final Cut Pro 5 Trainer.


-Apple Certified Trainer -Final Cut Pro 5, Level 1

-Apple Certified End User -Final Cut Pro 5, Level 1